Please note that the recommended version of Scilab is 2026.0.1. This page might be outdated.
See the recommended documentation of this function
Menu_Entries
Xcos editor menu entries
Contents
This section presents briefly all the menu entries of the Xcos editor. Many items are also available in pull-down menus shown by a right click when the mouse cursor is on a block, a link or in the main Xcos window.
File menu
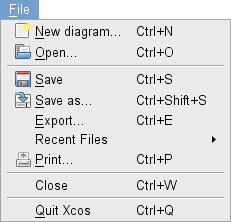
File:New (Ctrl+N)

Clicking on the New menu item open a new empty Xcos diagram in a new window. With this menu, you can open a new diagram or a new palette.
File:Open (Ctrl+O)

Select the Open menu item to load a XML (.zcos) or a binary file (.cos) which contain saved block diagram or a palette. The command open a dialog box allows you to choose the folder and the file.
File:Save (Ctrl+S)

Select the Save menu item to save the diagram in a XML file.
If you select this menu item and you have never clicked on the Save or Save As menu item, a dialog allows you to choose a directory and specify a file name without extension. The default extension is .zcos.
The diagram takes the name of the file (without the extension).
File:Save As (Ctrl+Shift+S)

Select the Save As menu item to save the block diagram or palette in a file with a new name.
A dialog box allows specifying a file name without the extension and a saving folder. The default extension is .zcos.
The diagram takes the name of the file (without the extension).
File:Export (Ctrl+E)
This item is used to export a figure of the current Xcos diagram. The export can be done in the WBMP, GIF, HTML, JPEG, JPG, PNG, SVG or VML formats.
File:Recent Files
Via this menu, you have a quick access to the recent opened files.
File:Print (Ctrl+P)

Print the current diagram onto a printer.
File:Close (Ctrl+W)
If several diagrams are opened, the Close action the current diagram. If only one diagram is opened, the Close action will close Xcos. The auxiliary windows as viewport, palettes, etc are also closed if necessary.
File:Quit (Ctrl+Q)
The Quit action will close Xcos. The auxiliary windows as viewport, palettes, etc are also closed if necessary.
Edit menu
Edit:Undo (Ctrl+Z)

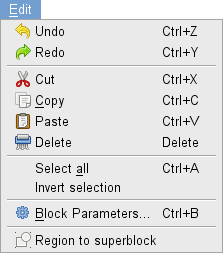
Select the Undo menu item to undo the last edit operation.
Edit:Redo (Ctrl+Y)

Select the Redo menu item to redo the last undo edit operation.
Edit:Cut (Ctrl+X)

Cut is used to remove the selected objects from the diagram and to copy them in the clipboard. When you cut a block all links connected to it are deleted as well.
Edit:Copy (Ctrl+C)

Copy is used to place a copy of the selected in the clipboard.
Edit:Paste (Ctrl+V)

Paste places the content of the clipboard in the current diagram.
Edit:Delete (Delete)

To delete blocks or links, select objects to be deleted and then the Delete menu item. When you delete a block all links connected to it are deleted as well.
Edit:Select all (Ctrl+A)
Select all the blocks in the current diagram.
Edit:Invert selection
Invert the current selection.
Edit:Block Parameters (Ctrl+B)

Open the block configuration dialog for the current selected block. The configuration depends of the used block (see the block help to obtain more information on its configuration).
Edit:Selection to superblock

Convert a selection of blocks into a superblock.
View menu
View:Zoom in (Ctrl+Plus)

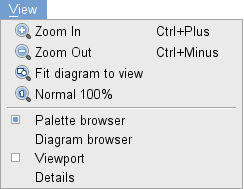
When you select this menu item the diagram is zoomed in by a factor of 10%.
View:Zoom out (Ctrl+Minus)

When you select this menu item the diagram is zoomed out by a factor of 10%.
View:Fit diagram to view

When you select this menu item the diagram is fit to the size of the current window.
View:Normal 100%

Resize the diagram components at their normal displaying dimensions.
View:Palette browser
Open the palette browser.
View:Diagram browser
Displays a window which lists the global properties of a diagram and all its objects (blocks and links). It presents in a tree form the scs_m structure content of the diagram.
View:Viewport
Display the Viewport window. This window is a complete image of the current diagram. With the Viewport, you can move the displaying working area onto a part of the diagram. You can zoom and unzoom part of a diagram.
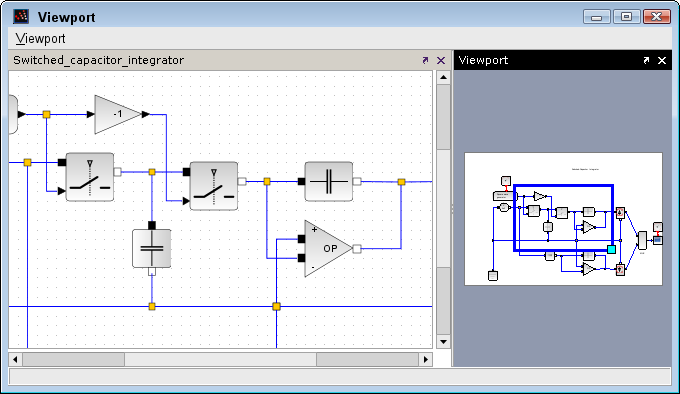
Above, you have an example of the viewport docked in the Xcos which is used to zoom on a part of a diagram. On the left the editor window presents the zoomed part of the diagram.
View:Details
Displays a window by selected block which list properties of block. It presents in a tree form the scicos_block structure content of the blocks.
Simulation menu
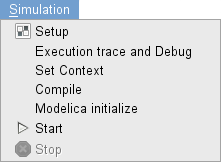
Simulation:Setup

In the main Xcos window, clicking on the Setup menu item invokes the dialog box below that allows you to change integration (simulation) parameters:
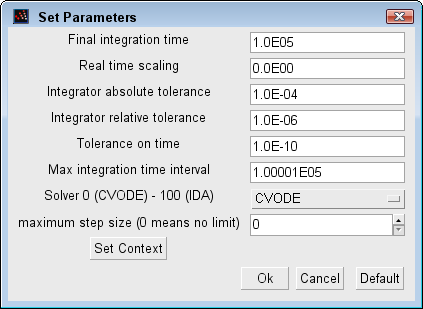
Final integration time: integration (simulation) ends at this time, it always starts from 0
Real time scaling: forces real time simulation by setting Xcos simulation in unit of time to 1 second.
Absolute and relative error tolerances: solver properties.
Time tolerance: the smallest time interval for which the ode solver is used to update continuous states.
Max integration time interval: the maximum time interval for each call to solver.it must be reduced if the error message "Too many calls" is encountered
Solver: select the numerical solver to be used. You have the choice between an ordinary differential equations (ODE) solver and an algebraic differential equations solver (IDA). If Xcos detects that your model requires an IDA solver, Xcos displays an information box on the automatic switching to the IDA solver.
Max step size: maximum time step taken by the solver. This parameter is useful to search localized singularities in a monotonic system response. For this type of response, the numerical solver increase automatically the step size for decrease the calculation time. If you think that your system is in this case, decrease the value of this parameter.
Set context: see explanation below
Default: this button reset the simulation parameters to their factory values.
For more information on the solver look at the See also section.
Execution Trace and Debug
Set Xcos in debug mode. This item opens the following dialog box in which you can choose the debugging mode. For more information, see the command scicos_debug
Simulation:Set Context
When you select this menu item you obtain this dialog:
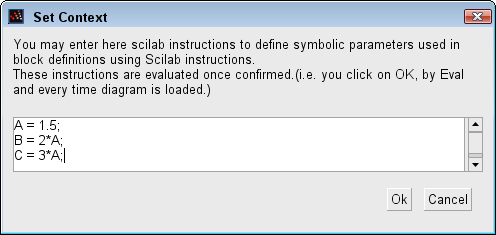
You can enter here Scilab instructions for defining the symbolic Xcos parameters used in block definitions or to do whatever you want.
These instructions will be evaluated each time the diagram is loaded. If you change the value of a symbolic Xcos parameters in the context, all the blocks that contains this symbolic parameter are updated when you click on OK. By example if you want to set the value of gain of several blocks to a value which depends on a single value, you can proceed like this :
We have three GAINBLK_f blocks, open the Set context dialog and writes the symbolic variables:
A = 1.5;
B = 2*A;
C = 3*A;
Then, open successively each block parameters dialog and set for the gain value the name of required symbolic value, here A,B and C.
Simulate:Compile
Select the Compile menu item to compile the block diagram. This menu item need never be used since compilation is performed automatically, if necessary, before the beginning of every simulation (Run menu item). Normally, a new compilation is not needed if only system parameters and internal states are modified. In some cases however these modifications are not correctly updated and a manual compilation may be needed before a Restart or a Continue.
Please report to us if you encounter such a case. Report bugs and wishes about Scilab
Simulate:Modelica initialize
This menu item opens a specific dialog to the Modelica compiler where you can see the components of your model and also select the solver between the Kinsol, Ida, Fsolve, Optim, Nelder Mead and Hompack solvers.
Simulate:Start

Select the Start menu item to start the simulation. If the system has already been simulated, a dialog box appears where you can choose to Continue, Restart or End the simulation.
Simulation:Stop

You may interrupt the simulation by clicking on the Stop menu item or on the toolbar button. You can change any of the block parameters and continue the simulation with the new values.
Format menu
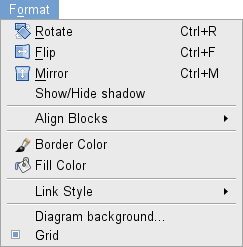
Format:Rotate (Ctrl+R)

Rotate allows to turn a block on the left with an of 90°. Rotation affects all the selected blocks.
Format:Flip (Ctrl+F)

To reverse the positions of the activation inputs and outputs set at the top and the bottom of a block, select a block and select the Flip menu item. This does not affect the order, nor the position of the input and output event ports which are numbered from left to right. Flipping affects all the selected blocks.
Format:Mirror (Ctrl+M)

To reverse the positions of the (regular) inputs and outputs set on the left and the right of a block, select a block and select the Mirror menu item. This does not affect the order, nor the position of the input and output ports which are numbered from top to bottom. Mirroring affects all the selected blocks.
Format:Show/Hide shadow
This menu allows to select 3D shape for selected blocks and associated parameters.
Format:Align Blocks
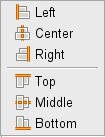
When you select several blocks, it is possible to align them on horizontal axis (Top, Bottom and Middle) or on vertical axis (Left, Right, Center).
Format: Border Color

This menu allows to change the border color of the selected blocks.
Format:Fill Color

This menu allows to change the fill color of the selected blocks.
Format:Auto-Position

This menu allows to change the position of the block.
First select the block(s) and select the appropriate menu item or use the shortcuts (P). The following list shows the results obtained.
Split Block (P)

Format:Link Style

This menu allows to change the style of the link.
First select the link and select the appropriate menu item or use the shortcuts (H), (S), (V), (O). The following list shows the results obtained.
Horizontal (H)

Straight (S)

Vertical (V)

Optimal (O)

Format: Diagram background
This menu allows to change the background color.
Format:Grid
This menu allows to activate / deactivate the grid. With the grid, the block and link placement on the working area is more easy and you obtain a more readable diagram.
Tools menu

Tools:Code generation
This menu allows to generate the simulation code associated with a discrete time Super Block. The code generation is obtained simply by selecting the Super Block and then this menu.
If the Super Block satisfies the required conditions, a dialog box pops up to ask for a block name, a directory where to put the generated files and for optional libraries requested by the linker. Given this information the code is generated, compiled and linked with Scilab.
The Super Block is automatically replaced by a new block which implements the generated code. It is then possible to run the modified diagram. The code for standalone use is also generated.
Help menu
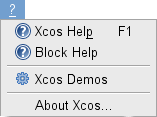
Help:Xcos Help (F1)

This menu opens the main help browser (if it is not open) on the Xcos help chapter.
Help:Block Help

To get help on a Xcos block, select the block and then click on this menu item.
Help:Xcos Demonstrations

The item allows to open some examples of Xcos diagram.
Help:About Xcos
About Xcos item display the current version of Xcos in a dialog.
See also
- scicos_debug — Set the level of the Scicos debugging
- ode — ordinary differential equation solver
- dassl — differential algebraic equation
| Report an issue | ||
| << xcos_debug_gui | Xcos | Spreadsheet >> |